Accessing the VMware vCloud Management Portal
Access credentials for VMware vCloud Director are sent to your email address (Figure 1).
The email contains:
- Your organization name (for example:
vmw-stud-233) - Username and password for accessing:
- VMware vCloud Director
- HelpDesk portal
- Your public external IP address
- Your internal local network IP range
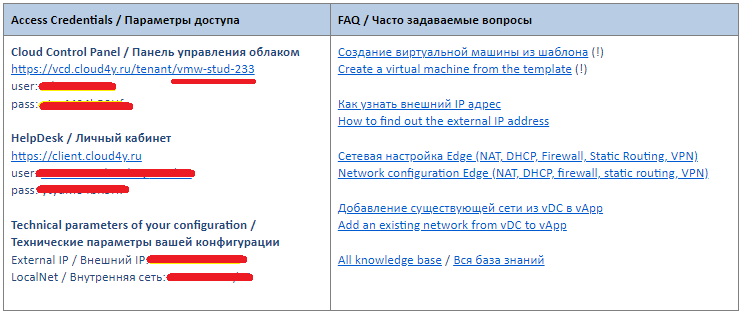
Figure 1 — vCloud Director access credentials email
To access the VMware vCloud Director web portal (Figure 2):
-
Open the appropriate link:
https://vcd.cloud4u.com/tenant/YourOrganizationName/ - Enter your username and password.
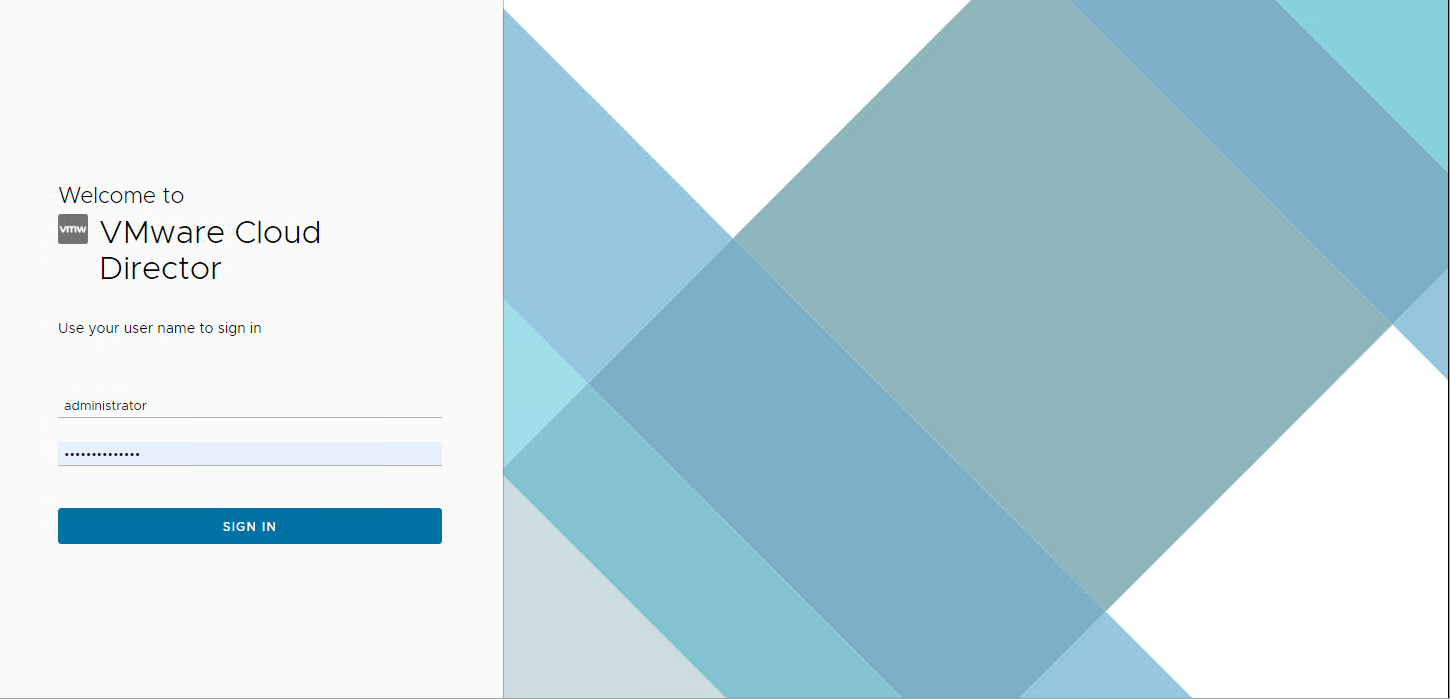
Figure 2 — VMware vCloud Director login window
3. Select the available Virtual Data Center (VDC) assigned to you.
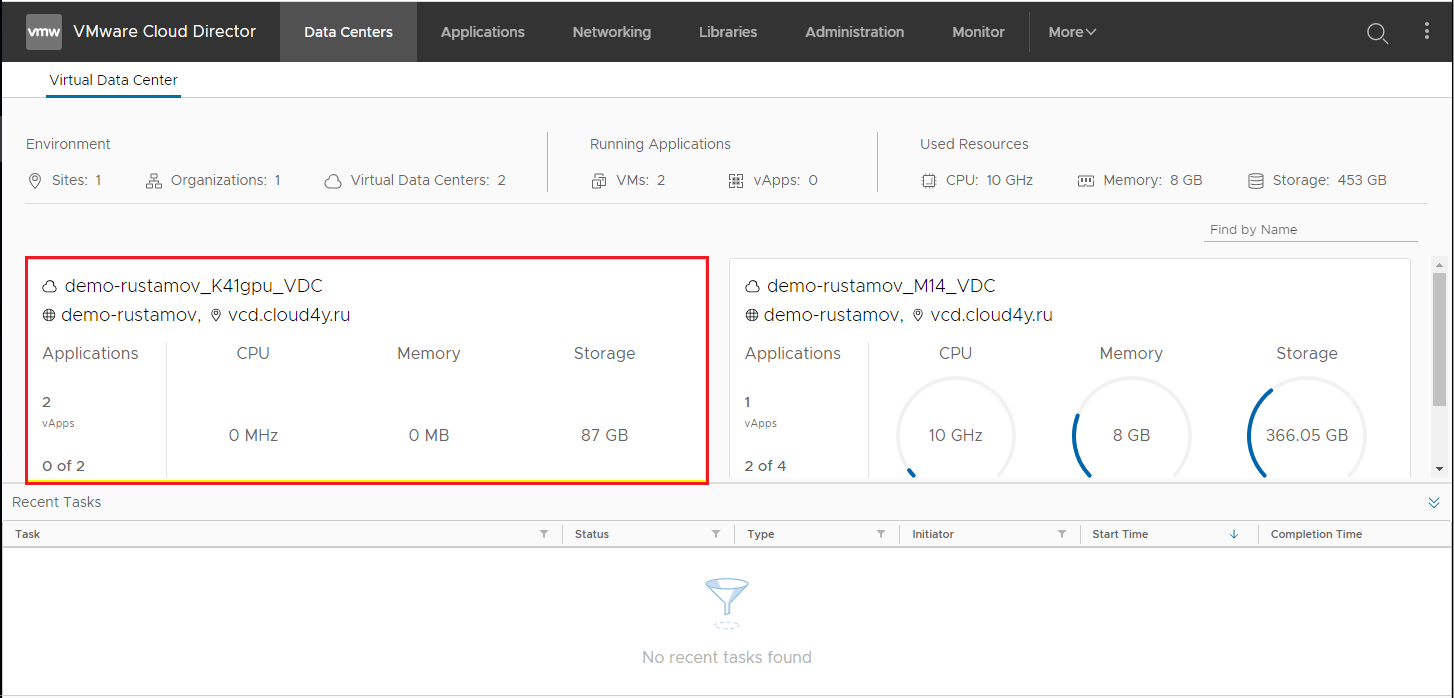
Figure 3 — VDC selection window
Creating a vApp and Virtual Machine
A vApp is a container used to group and manage one or more virtual machines collectively.
A VM (Virtual Machine) is a virtualized computer that uses allocated physical resources such as CPU, storage, and network adapters.
Creating a vApp
To create a vApp (Figure 4):
- In the left navigation panel, open the Compute section and select vApps.
- Click New → New vApp on the right side of the interface.
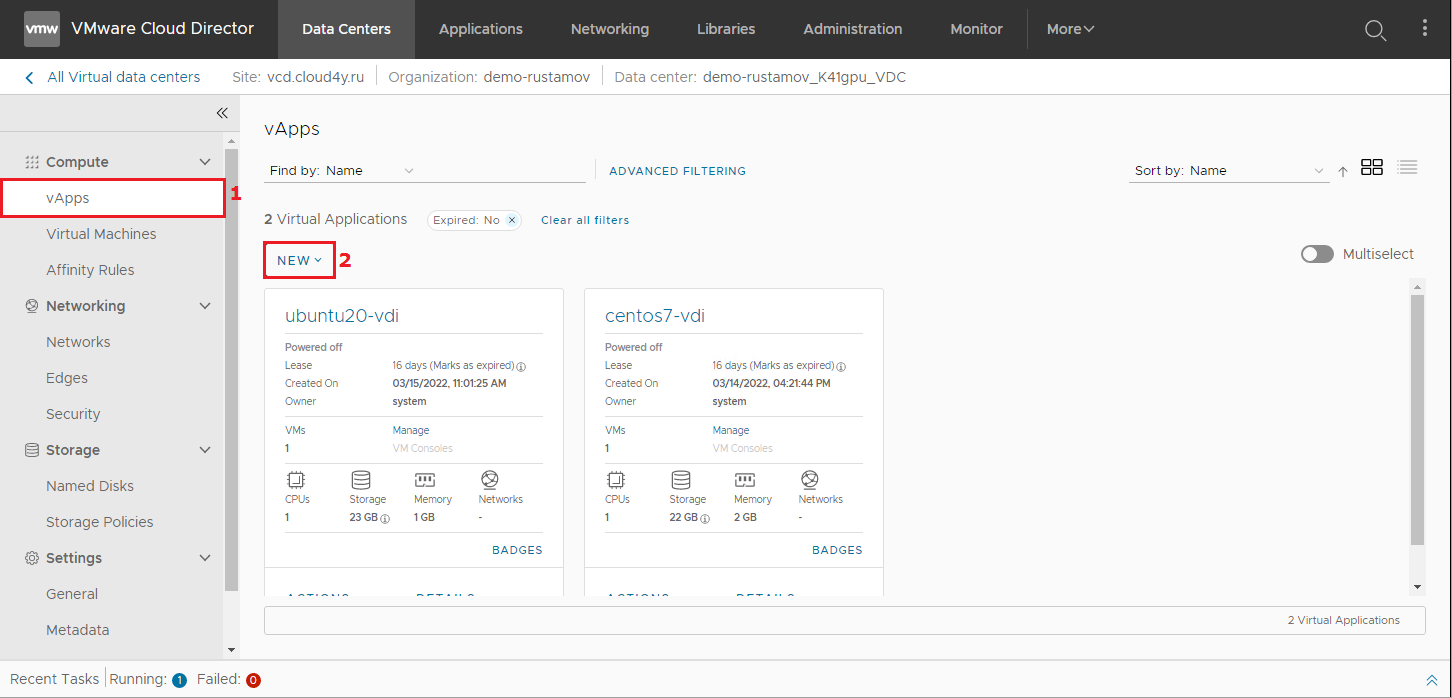
Figure 4 — Creating a new vApp
vApp Creation Window
The vApp creation window will open (Figure 5).
Available fields:
- Name — Name of the vApp
- Description — Optional description for the vApp
- Power on — Automatically powers on the vApp after creation if enabled
- Create — Creates the vApp
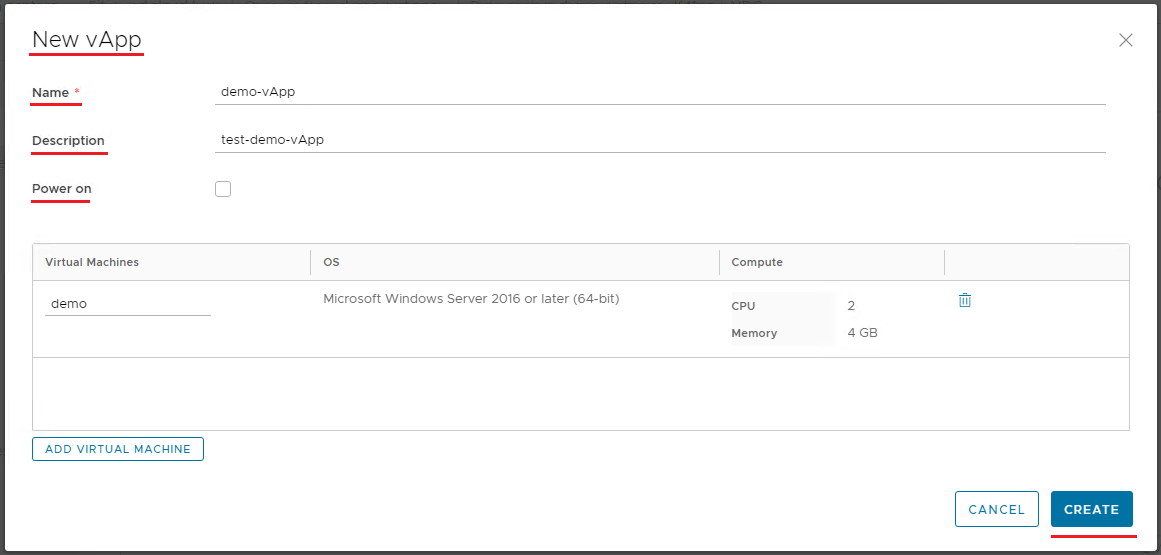
Figure 5 — vApp creation window
Adding a Virtual Machine
- Click Add Virtual Machine.
- The New VM creation window will open (Figure 6).
Available parameters:
- Name (1) — Name of the virtual machine
- Computer name (2) — Hostname inside the guest operating system
- Description (3) — Description of the virtual machine
- Type (4) — VM deployment method:
- New — Installs a new operating system from an uploaded or available ISO image
- From Template — Deploys a preconfigured virtual machine template ready for use
- Power on (5) — Automatically powers on the VM after deployment
- Templates (6) — List of available operating system templates
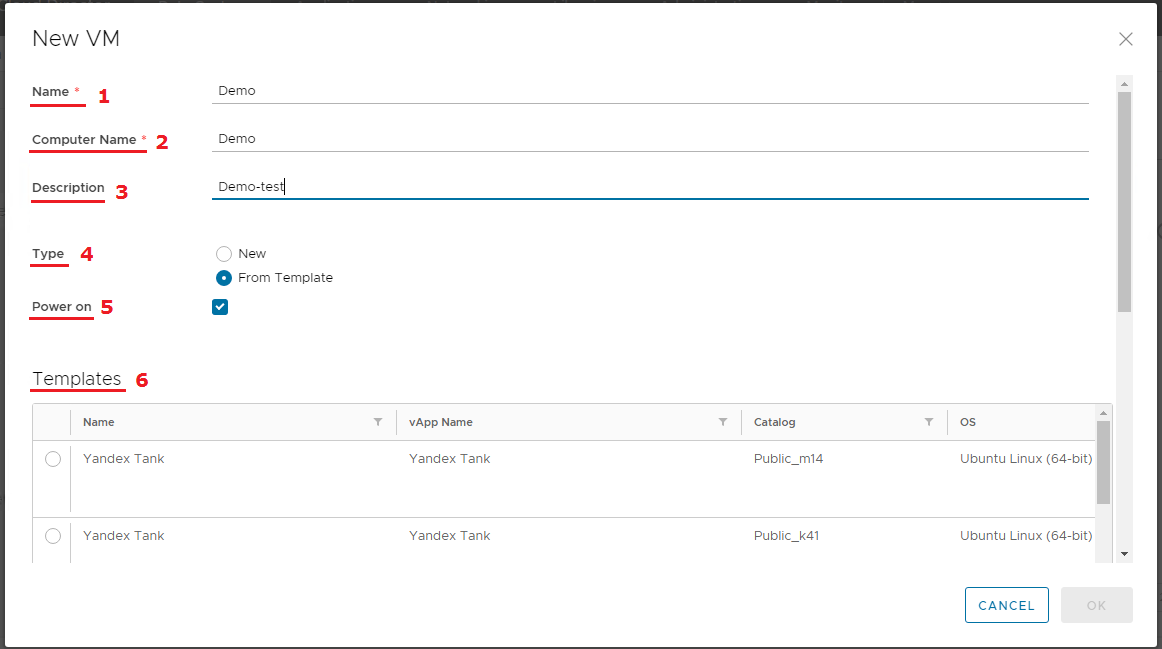
Figure 6 — New VM creation window
Selecting a VM Template
In the template selection window, choose the required operating system template (Figure 7).
In the catalog filter field, enter your data center identifier (for example: m14, k41, etc.).
If you are unsure which data center hosts your infrastructure, contact your account manager.
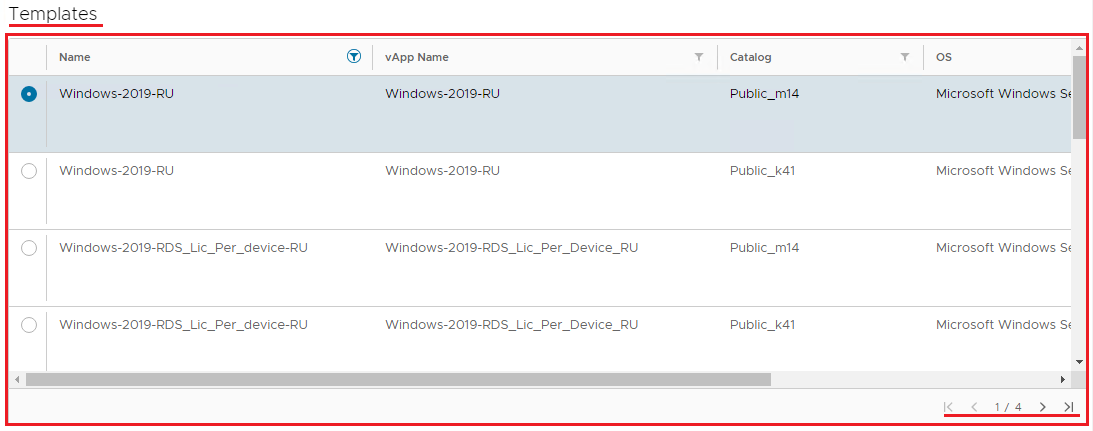
Figure 7 — Available virtual machine templates
Additional VM Configuration Options
Additional virtual machine configuration options are available during deployment (Figure 8):
- Storage Policy — Select the storage policy available for your virtual disks
- NICs — Configure virtual network adapters
It is recommended to use the VMXNET3 network adapter type.
You can also connect the virtual machine directly to an existing internal network.
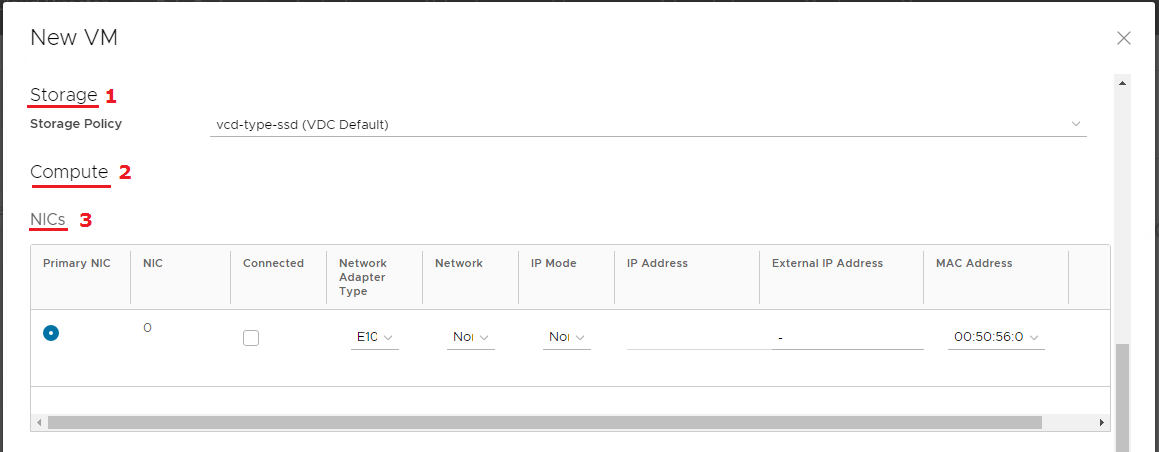
Figure 8 — Virtual machine configuration options
Deploying the Virtual Machine
After completing all required settings:
- Click OK
- Click Create
The virtual machine deployment process will begin.
Deployment progress can be monitored in the Recent Tasks panel located at the bottom of the VMware vCloud Director interface (Figure 9).

Figure 9 — Recent Tasks panel
When deployment is complete, the task status will change to Succeeded.
Managing the Virtual Machine
Starting a vApp
Starting a vApp powers on all virtual machines contained within it.
To start the vApp (Figure 10):
- Select the required vApp
-
Navigate to:
All Actions → Power → Start
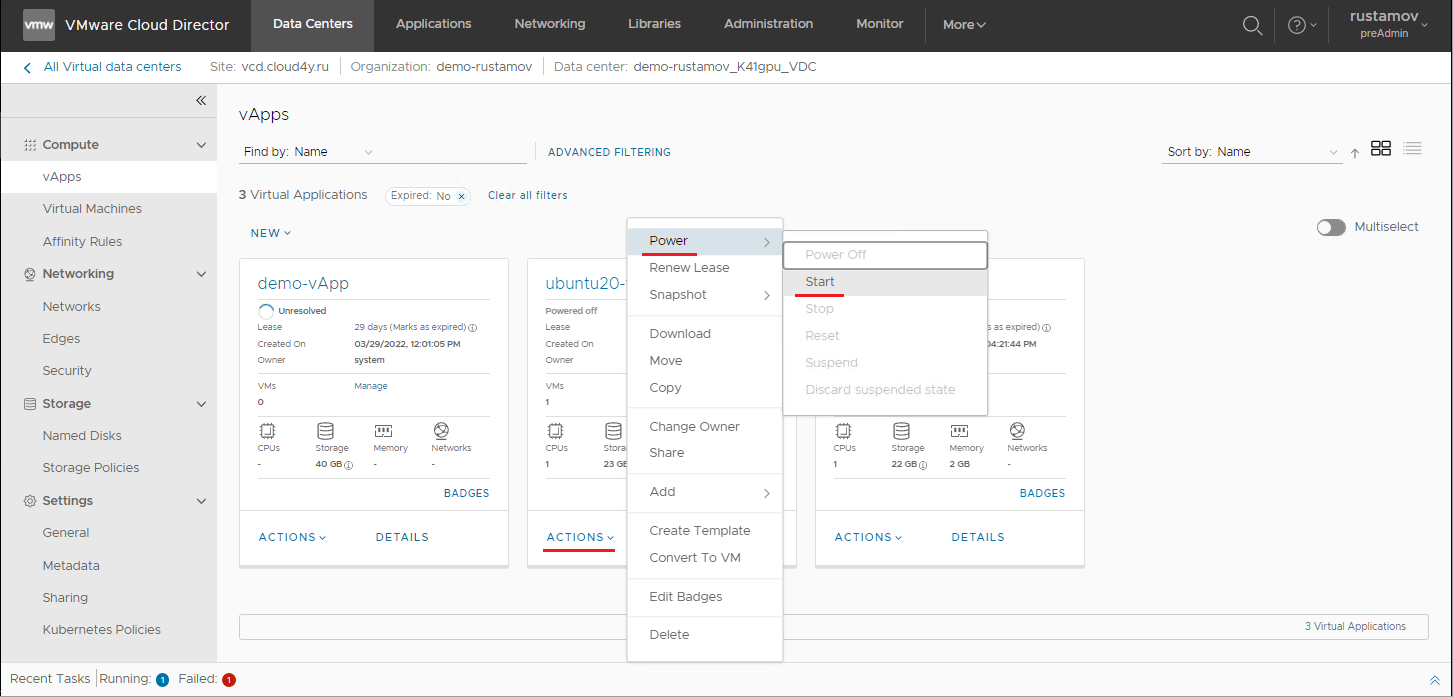
Figure 10 — Starting a vApp
Retrieving the Virtual Machine Password
To view the password for the created virtual machine:
- Click the name of the created vApp (Figure 11).
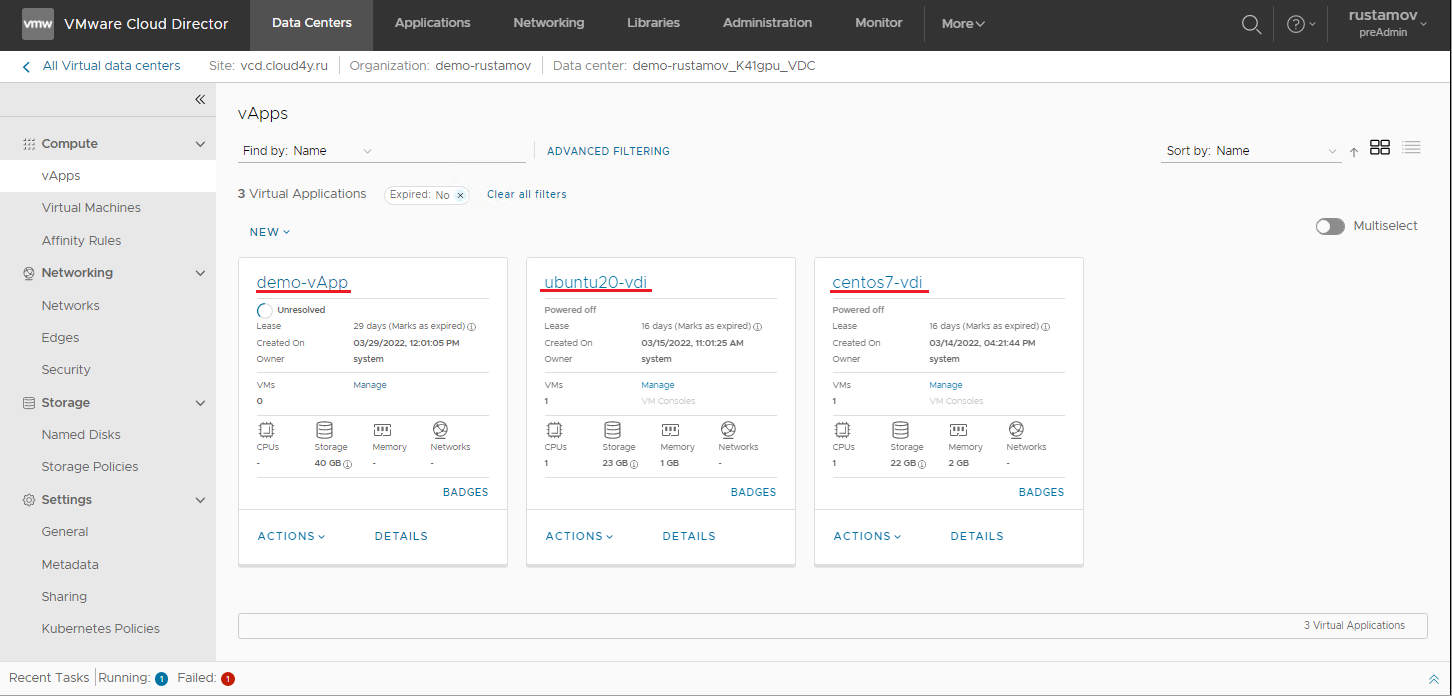
Figure 11 — Created vApps panel
Open the Virtual Machines tab and click the name of the virtual machine (Figure 12).
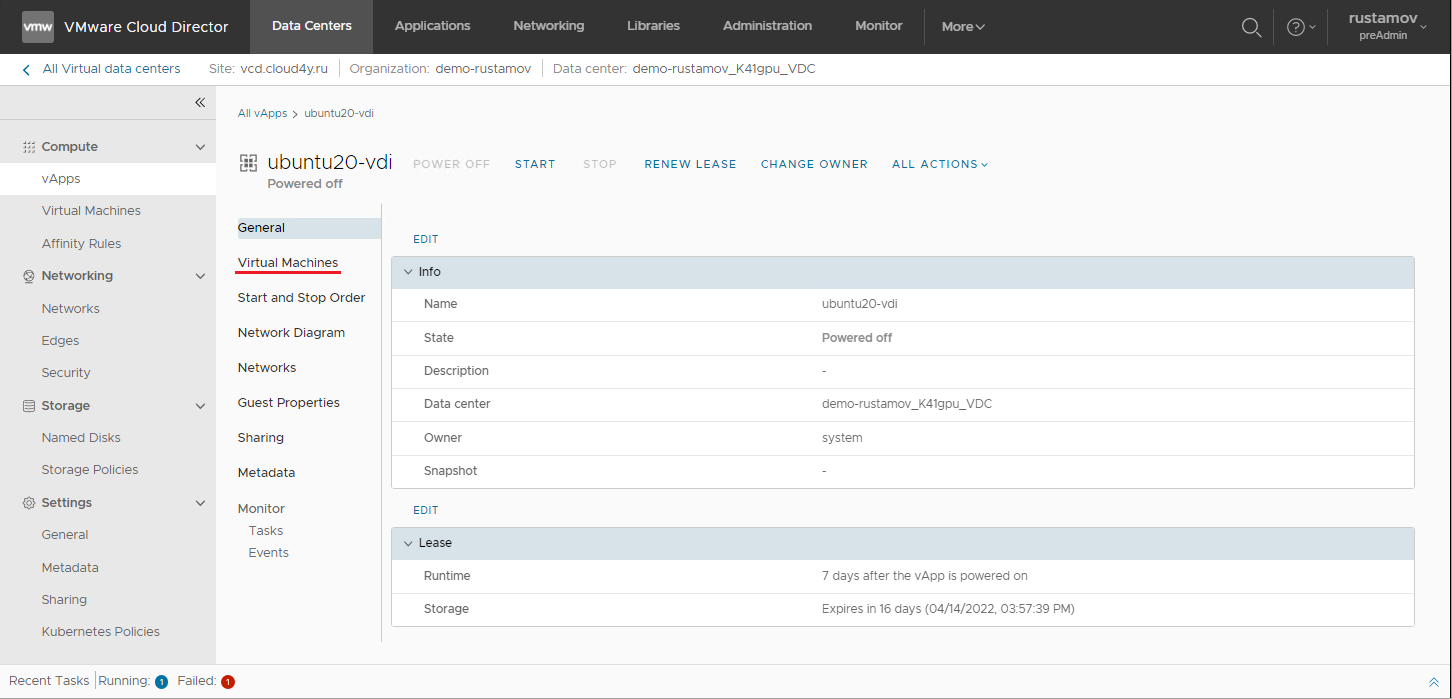
Figure 12 — Virtual Machines tab within the vApp
Select the required virtual machine (Figure 13).
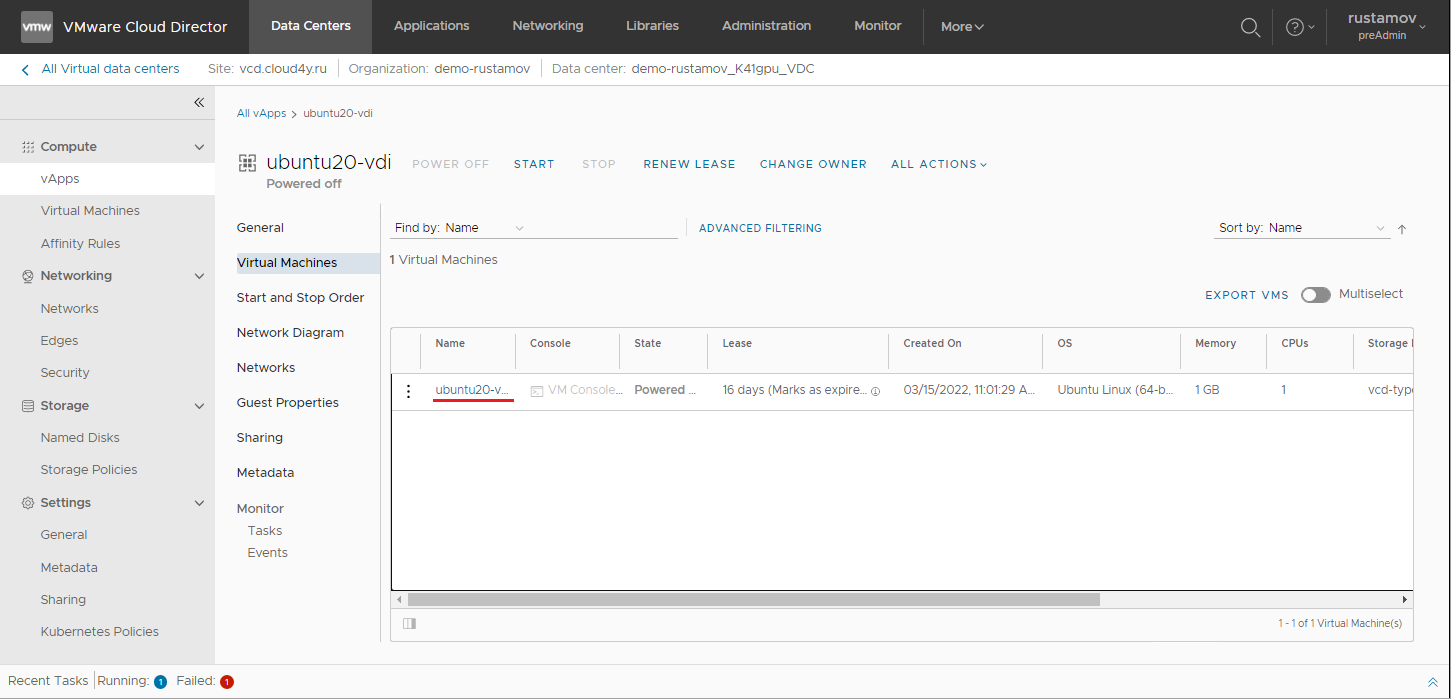
Figure 13 — Selecting a virtual machine within the vApp
Open the Guest OS Customization section and click Edit (Figure 14).
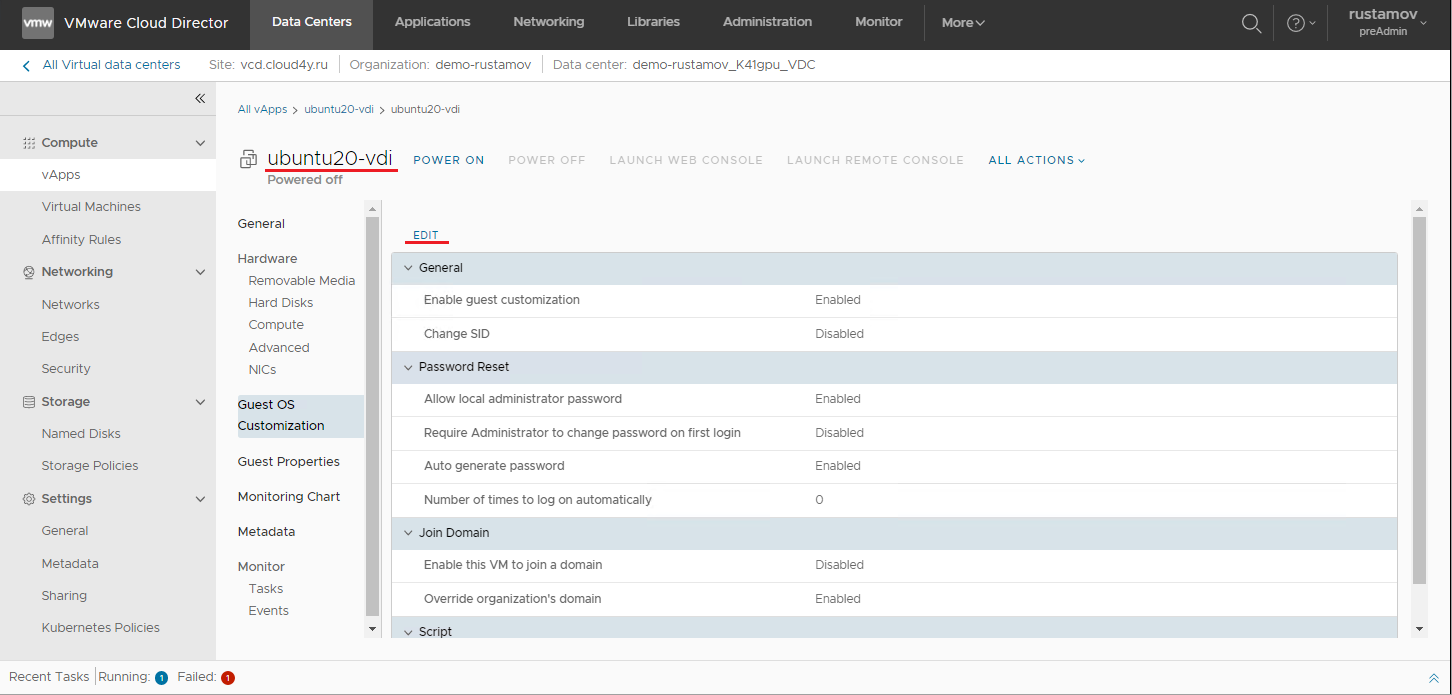
Figure 14 — Editing Guest OS settings
- The generated password for the virtual machine will be displayed in the opened window (Figure 15).
Please save or securely store this password.
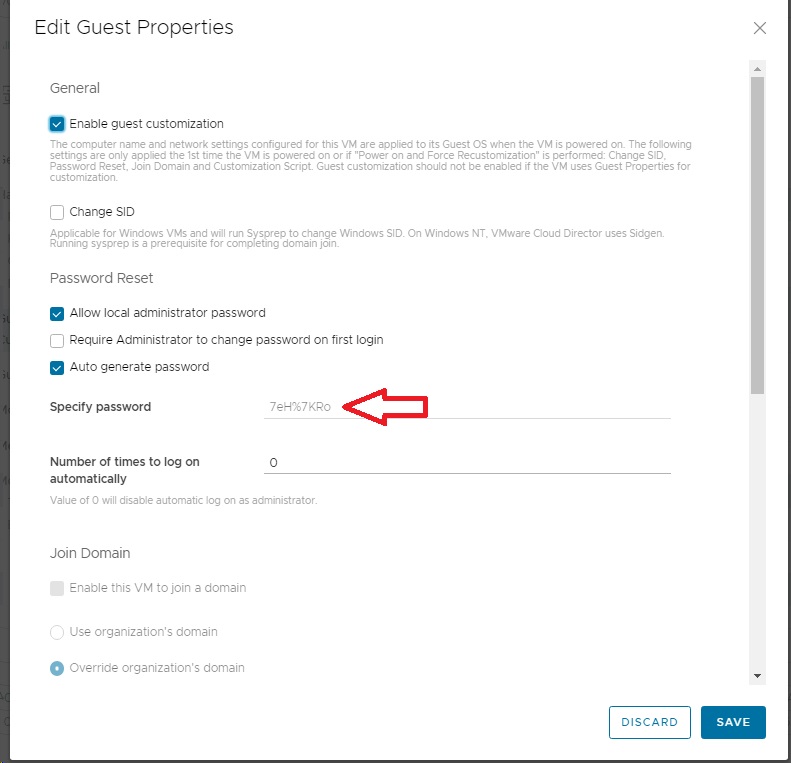
Figure 15 — Guest operating system customization settings
Changing the Generated Password
You can manually change the generated password.
To do this:
- Disable the Auto generate password option
- Enter the required password
- Click Save
The virtual machine must be powered off before changing the password.
After changing the password, the virtual machine must be powered on using the following option:
- Power On
- Force Recustomization
This applies the new password settings to the guest operating system.